COCOA Castle House graphics v1 4.004

Flying monkey TV (FMTV) has a busy weekend ahead, on Friday I will be making some micro-docs and mini-promos for the forthcoming Castlegate Festival on the 20th & 21st June. Friday is the set-up day and not open to the public, but I will be interviewing the artists and shooting the set-up and environs, and making a few short videos about the activities to go online before the event.

20june_460x230_3

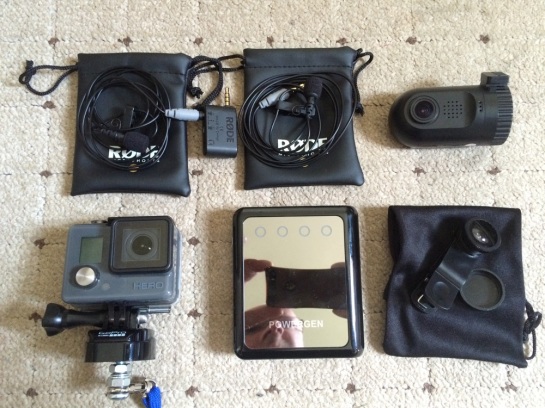
On Saturday 20th I will be joining the People’s Assembly End Austerity Now public demonstration in London, and documenting that in whatever way I can. I am not planning any editing on-the-fly, but might publish a few clips from my iPhone. Other than the iPhone 5s, I will be taking a basic GoPro Hero, possibly a Canon EOS 550D and the RODE SmartLav+ mics. I have improvised a couple of wrist straps for the GoPro & iPhone and will also be taking a 12,000 mAh NiMH battery to recharge the cameras throughout the day. I don’t have any specific agenda for my shooting and have no official role, so I’m just going to see what happens.

On Sunday 21st I will be back in Castle House in Sheffield to join the Castlegate Festival and will be on-site throughout the day to talk to people about FMTV and how I go about making videos.

The most important aspect of this activity for FMTV is the workflow. The whole point of FMTV is to use easily available technologies (that is, not professional equipment), but still achieve good quality and get it published quickly. Sure, we can all shoot a bit of smartphone video and get it online very quickly, but the aim of FMTV is to make is as near-broadcast quality as is reasonably possibly.

The smallest hurdles to making half-decent TV are at the beginning and the end, that is the capture and the publishing. The world is awash with cheap, high-quality cameras and I have more online video capacity than I can possibly fill, but it’s the workflow between the two that requires the skill, and this is where it gets more difficult.
IMG_2823

A pair of RODE SmartLav+ mics with twn adapter, E-Prance DashCam, GoPro Hero, 12,00 mAh USB battery (with iPhone 5s in the reflection) & clip-on fish-eye lens.

Whereas there’s nothing wrong with posting informal, unedited videos online, if you have more purpose it often desirable to edit out the umms and ahhs, and the WobblyCam shots. I bought the iOS version of iMovie and have looked at it several times but, beyond basic trimming, it doesn’t do anything I want. I have no doubt it will mature, but I have decided to edit using Final Cut Pro 6 (FCP6) on an oldish MacBook. There are other video edit apps for iOS, but I don’t have an iPad yet and editing on an iPhone screen is nothing less than painful.

IMG_2827

FiLMic Pro

However, on the plus side, when I was looking for apps that would record audio from external mics whilst shooting video (another thing iMovie does not do), I bought an app called FiLMiC Pro by Cinegenix, which is superb (can’t find the price but it was only a few pounds). Unlike the built-in camera app, FiLMiC Pro allows you to create presets that store different combinations of resolution, quality and frame rate, rather than the built-in take-it-or-leave-it settings. I have found some less than complimentary reviews citing its flakiness, and I have had a few problems, but only a few. It allows you to choose where in the frame to focus and where to exposure for, and it allows you to lock both settings.
http://www.filmicpro.com/apps/filmic-pro/

So, to shoot the promos / mini-docs, my main camera will be the iPhone 5s, controlled with FiLMiC Pro, with sound for interviews from a pair of RODE SmartLav lapel mics.
http://www.rode.com/microphones/smartlav

Then I will download the video clips to the Mac and transcode them into Apple Intermediate Codec (AIC) for editing. Some apps seem to be able to edit inter-frame encoded video (such as the H264 from the iPhone), but in my experience FCP6 does not handle it well during editing. I don’t know much about the specification of AIC, and it appears to be a lossy format, but it works well for me.

For the edits that I want to get online quickly, I will master to 1280x720p 25fps using a square overlay. This is so that I can edit the videos only once, in 16:9 aspect ratio, but they will be action-safe for uploading to Instagram, which crops everything square by default. The reason that we (the Studio COCOA team) decided to make things Instagram-friendly is because it is populated by a younger audience than us middle-aged Twitter freaks, and is appropriate for the the activities taking place over the weekend.

IMG_2703

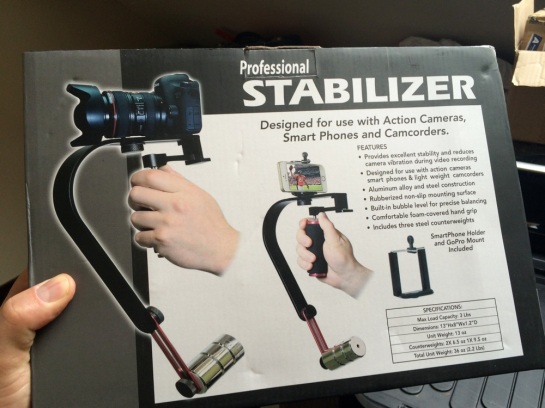
I also bought a stabilizer mount, not specifically for this job, but it was very cheap and comes with a smartphone mount, and this might correct some of the unintended WobblyCam shots when operating such a small camera. I also intend to experiment a bit with some other features of the iPhone 5s’ superb built-in camera, such as the panoramic still capture and the 120 fps slow-motion video capture. I also have a clip-on fish-eye lens (which fits any smartphone) that is remarkably good.

And finally, I will also be capturing timelapse, as I usually do, using CHDK-hacked Canon Powershot cameras, and will also try out the timelapse function on the GoPro Hero.
http://chdk.wikia.com/wiki/CHDK

Stand by:
https://instagram.com/bolam360
https://twitter.com/RBDigiMedia
http://flyingmonkey.tv

#CastlegateFest
https://twitter.com/castlegatefest
http://cocoartists.co/

COCOA Castle House graphics v1

After something of an enforced hiatus, Flying Monkey TV has been invited to be part of the Castlegate Festival in Castle House (the old Co-op building), Sheffield, UK over the weekend of 20th & 21st June. Please note, I will only be there on Sunday 21st but will have some video showing on the 20th.

I will be making micro docs & promo videos, 15 seconds long so that they are Instagram-friendly, and publishing them online. I will be covering the set-up of the event on Friday 19th, and will be on-site for chats and a kind of drop-in nano workshop on the Sunday. It’s not a workshop exactly, but I will be making short videos and showing my methods and how to make the media suitable for online social media channels.

IMG_2604

Castle House, a disused department store.

IMG_2596

Castle House, the building is huge, both spooky and inspiring.

The event is a collaboration between the University of Sheffield and Studio COCOA (Castlegate Open Community of Artists), a collective of artists organised by current Yorkshire Artspace artist-in-residence Paul Evans.

More information about the Castlegate Festival and Studio COCOA is here:
http://www.sheffield.ac.uk/castlegatefestival/home
http://cocoartists.co/

If you are not already aware of what Flying Monkey TV is all about, it is a project conceived by myself and artist / media producer Matt Lewis back in 2010 to make documentaries using domestic-level, available technology and open-source software to manage the media overload that the proliferation of cameras has produced.

We applied for a number of funding sources and did attract a small amount of money for some research and development of both the ideas and techniques. However, “available technology” has advanced so quickly, it has been difficult to know where to place the goal posts and we have not been successful in attracting any funding more than a few hundred pounds here and there. Consequently, the project is running on an as-and-when basis. This is one of those whens.

IMG_1606

Castle House has seen better days.

This iteration of the project will be using an iPhone 5s (I know, not the most available technology) with RØDE smartLav+ microphones and a stabilizing camera mount in order to shoot the best possible quality video and audio (for a domestic set-up). The iPhone 5s has a superb built-in camera, but the Camera app only gives limited control and does not allow capture of audio from external mics. I will be using an app called FiLMiC Pro to shoot with, and Final Cut Pro 6 to edit the video. Finally I will be compressing the videos for online delivery using Apple QuickTime Pro. The videos will be shot and edited with social media channels in mind.

I will also be capturing the whole thing on CHDK-hacked timelapse cameras (obvs).
http://chdk.wikia.com/wiki/CHDK

This is not a no-cost set-up, but it is intended to show how you can achieve near broadcast quality with only a tiny, one-person set-up. Below are a couple of very quick videos I made recently using the iPhone 5s and the smartLav+ mics (I have ordered a stabilizer to smooth out some of that camera shake). I will be around all day on Sunday 21st so please come along and say hello.

Richard Bolam
Twitter RBDigiMedia
I
nstagram bolam360

https://vimeo.com/128615042

https://vimeo.com/128800828

Screen shot 2014-01-15 at 08.58

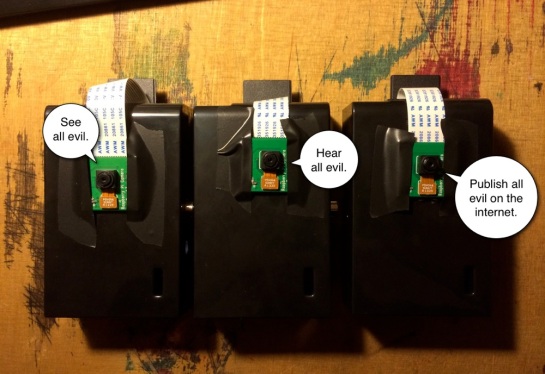
Raspberry Pis with camera modules, ready for testing.

Okay, it’s a whole year since my last post on this blog. I’ve been busy.

Flying Monkey TV was selected for an Arts Council England (ACE) funded mentoring scheme in 2010, via The Culture Company‘s Artimelt programme, aimed at incubating early-stage projects that might then go on to greater things.

Although the project has had some funding early on, it was not much and nothing ongoing. We also applied for funding from Umbro Industries, 4IP (now defunkt) and Nesta‘s Digital R&D programme, amongst others, but no joy so far. I suspect I am a whole generation too old for Umbro and we didn’t seem to tick the right boxes for Nesta. In the meantime, I’ve decided to stop applying for stuff and start applying stuff, if you see what I mean. Life is short and funding applications are a very onerous task best left to professional administrators.

At least to give ACE their money’s worth, I have been continuing to develop techniques and accumulate equipment to progress the project despite its lack of funding. The downside is that it gets done when it gets done. Anyway, out of my own pocket I’ve just acquired a little testbed of equipment that I can use to test my ideas.

If you were reading my Flying Monkey TV Missing Link blog from a couple of years ago, you will know that some of my technical research of the time, thanks to a small bursary from Access Space, Sheffield UK, was rendered entirely pointless by the launch of the Raspberry Pi platform. It’s taken me a while to get around to it, but late last year I got my first Pi and this week have just accumulated three more, and all four with camera modules. I have only just got together all the various bits and bobs to make it into a functional network, but stay tuned for more shenanigans.

I am also testing battery-powered setups and solar charging, so expect a few passes close to the sun.

3d stereo experiments.009

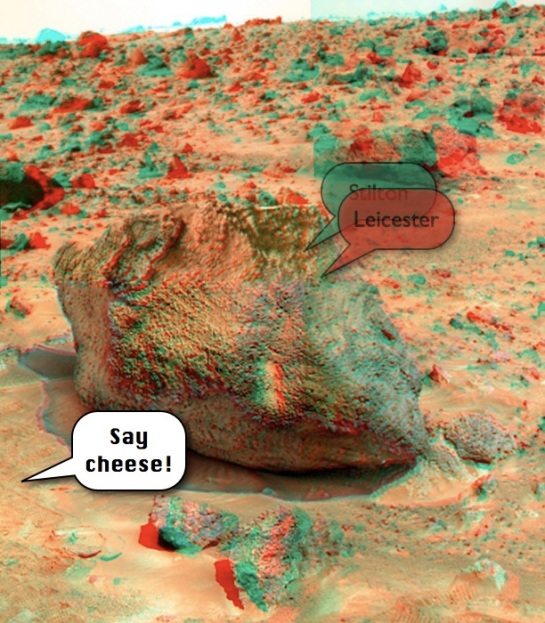
Yogi from Mars 3D

Going off-piste again this week, kinda. Randomly, I wondered just how easy it would be to capture and process stereo 3D timelapse with open-source tools. Having mostly ignored 3D, and being largely unimpressed by its cinema application, I was still wondering what the killer application for stereoscopic photography.

These days, a number of single lens cameras have a “3D” function which stitches together a number of exposures into a navigable image that allows the point-of-view (POV) to be changed, interactively. To my mind this is not really 3D, it’s like the moving lenticular images we used to collect in the 1970s. What I am interested in is true stereoscopic imaging, which requires genuine binocular vision to give a convincing effect of depth.

Tim Dashwood has written an excellent introduction to stereo/3D photography that I do not intend to duplicate, but what I am going to cover is the specifics of doing it with CHDK, FFMpeg and ImageMagick.
http://www.dashwood3d.com/blog/beginners-guide-to-shooting-stereoscopic-3d/

This is just an introductory blog post and I’m not going to get to any workflows just yet.

Stereo imaging has been around since 1840, almost as long as photography itself, and here are some amazing stereographs captured during American Civil War.
http://www.theatlantic.com/infocus/2012/02/the-civil-war-part-3-the-stereographs/100243/

Some of these give away the fact that they were show with one camera in two positions.

Landscape

I was introduced to stereoscopic 3D it in the 1970s via my sister’s View-Master, but this was not much more sophisticated than the widely available stereo viewers from the nineteenth and early twentieth centuries.

Stereoscoop_VM

The documented optimum lens separation for human vision is 65mm, give or take, and my eyes are pretty much exactly that distance apart. However, according to various sources larger separations work fine for some subjects and for landscapes and distant objects, a larger separations will work fine. I will be doing some tests with different sized subjects.

For reference, I am not interested in red/cyan anaglyph type image, because of the weird colour effects, but I am going to use this technique for the sake of being able to display them on vanilla monitors. Not everyone can do it, but I can also do the cross-eyed right-left trick too, although it’ not practical for any length of time.

Recently, I bought a 3D LED TV that supports passive polarised glasses and I saw an excellent demo of a Fujifilm W3 3D camera displaying media on LG monitors at a photography trade show in 2010.

There are some excellent existing resources for shooting stereographs with CHDK, including the StereoDataMaker site, and Gentles Ltd, and I’ll add more info about other resources soon.

I have mixed feelings about 3D and am not sure just what I really want to do with it, but how hard can it be? I was not sure how to prepare the media and assumed it would be more difficult than it is. Turns out processing pairs of images is very easy in ImageMagick, and as far as the polarised light monitors go, all the cleverness is done in the screen so you just have to give it 2 images side-by-side.

It never occurred to me that it would be so easy.

So, side-by-side is my eventual destination format, but using red/cyan anaglyph for convenience and online dissemination.

Anyway, I’m running out of time, but I might update this post later. In the meantime here are a few links and I’ll post more soon with come code and practical tests.

Stereoscopy.com
http://www.stereoscopy.com/gallery/

History of Sterography
http://www.arts.rpi.edu/~ruiz/stereo_history/text/historystereog.html

A640 rotated_84_2

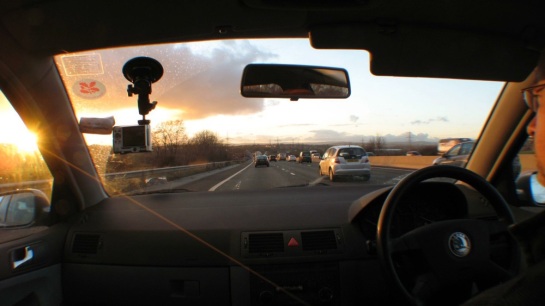
Having been flying around the country over the past couple of weeks, I’ve shot a lot of timelapse out of the front windscreen. Just because I can.

It’s largely thanks to CHDK and I have managed to record myself getting lost on routes between Sheffield, Lancaster, Leeds, Newcastle, Nottingham and York. I have a few plans for this media, but one journey is already online here:

This was quite a successful Flying Monkey TV experiment and I had it edited and online within three hours of getting home.

These journeys were mostly shot on a Canon PowerShot A560, timelapse-enable with CHDK, and mounted on the inside of the front windscreen with a suction mount (see below). I mounted the camera hanging from the top of the screen, upside down. This meant that it was in line with the passenger side roof pillar and hence did not obscure my view.

I don’t use the auto-rotate feature in most cameras because it sometimes gets confused and can give you a few incorrectly rotated frames here and there. Consequently, shooting this way, I end up with an upside-down video that then needs rotating.

559CANON_full_2048_03pct

I used to drop them into Final Cut Pro, render them and export them to a new movie file, which works fine, but I think it’s time to write a Bash script to do it.

No sooner said than done! Well, not quite, but it was much easier than I imagined. As usual Google managed to find some very helpful resources for me to cannibalise. Writing the code is much faster than documenting it into a usable blog post.

I started by reminding myself how to create a basic for-next procedure (detail included here for other noobs). Here is a bit of basic code with lists the files in the present working directory ending in “.JPG” (don’t forget this is case-sensitive) and echos them to the screen. The semicolons separate the statements and the “done” terminates it.

for i in $(ls *.JPG); do echo $i; done

For the next step, instead of just listing the file names to the screen, I added the ImageMagick step to rotate the image and write it over the original.

for i in $(ls *.JPG); do convert $i -rotate 180 $i; done

As you might have already gathered, I like some progress feedback so added an echo with the file count and file name.

for i in $(ls *.JPG); do convert $i -rotate 180 $i; x=$(($x+1)) ;echo “$i $x”; done

However, a current file number is only of use if you know how many more to go. A bit of googling revealed this forum thread and the code:

ls -l | wc -l

This lists all the files in the current directory and then pipelines that list to give an integer count of the items in that list. It’s not necessary if this is just a temporary folder and it’s cleared between uses, but if you want to filter the file types you can add a wild card search like this:

ls -l *.JPG | wc -l

I found information about the two commands on linux.about.com and a forum thread which combines the two on unix.com.
http://linux.about.com/od/commands/l/blcmdl1_ls.htm
http://linux.about.com/library/cmd/blcmdl1_wc.htm
http://www.unix.com/unix-dummies-questions-answers/36490-ls-command-listing-number-files.html

So my final piece of code (for this iteration at least) is here:

x=0; c=$(ls -l *.JPG | wc -l); for i in $(ls *.JPG); do convert $i -rotate 180 $i; x=$(($x+1)) ;echo “$x /$c $i”; done

This sets x to be 0, c to be the number of files with filenames ending in “.JPG” in the current directory, rotates each one of them by 180 degrees, overwrites the original file and echos the file number, the file count and the filename. It’s pretty basic and I’ll roll it into a script soon.

There may well be better ways of doing this, but it worked well as an exercise to reinforce my learning.

I’m going a bit off-piste with this post, and looking at the hidden-in-plain-view potential of some of the libraries, very familiar to Linux geeks, but pretty much unknown to the outside world.

Although I talk about the past a lot, I’m not nostalgic. I don’t miss the frustrations of the past. I just like to remind myself how good things are now. By the way, I am by no means a computer historian, and my opinions and experience are subjective. If I post anything that is factually incorrect, please let me know.

I realise some of this might be bleeding obvious to the Linux world, but those of us cloistered for years in the walled-garden of the Mac OS X GUI, it’s quite a revelation.

As I’ve said before, I’m a lapsed programmer and used to write commercial software using framework applications, primarily FileMaker Pro 3.0 amongst others. FileMaker has developed into a very sophisticated rapid application development (RAD) platform now that FileMaker Inc have got around to including the features that us developers were clamouring for in the 1990s.

Given a choice, I am very happy tinkering with nice GUI-based visual programming / scripting tools, but the compelling reason for me to get my hands dirty at the command line is the fact that nothing gets in the way.

One of my most enduring love / hate relationships has been with HyperCard / SuperCard. I remember being excited, almost to the point of peeing myself, when I first got wind of HyperCard. My programming days started with BBC BASIC, then Spectrum BASIC, then the woefully under-implemented Commodore 64 BASIC. After that things just got worse and worse and Atari ST BASIC was absolutely useless. I can’t even remember if there was an implementation for the Amiga, but I did try CanDo which was promising but way ahead of its time. As the years passed it got more and more hard work to get to a command line and I kind of missed the direct simplicity of BBC or Spectrum BASIC, which were at least broadly complete implementations that you could actually do stuff with.

Update: I completely forgot about STOS on the ST and AMOS on the Amiga, which were both brilliant.
http://en.wikipedia.org/wiki/STOS_BASIC
http://en.wikipedia.org/wiki/AMOS_(programming_language)

HyperCard was a revelation to me as it was on the desktop, and you could easily create GUI-based applications with it, and it had a pretty decent plain-English programming language. You could actually do stuff with it.
http://en.wikipedia.org/wiki/HyperCard

As desktop computers “improved”, programming became more and more remote from the user, and there was a very frustrating period in the late 80s and early 90s where application software was not mature enough, but programming not accessible enough, to plug all the gaps in our productivity.

Fortunately those days are over.

There were many good things about HyperCard, but it was lacking in some fundamental functions, and for me, they were colour and structured graphics. HyperCard was strictly monochrome and bitmap only, and although Apple eventually did include plugins that supported colour graphics, it was an afterthought and not adequately implemented. Apple neglected HyperCard for years and it is now a minority interest tool. I still use it for programming on old compact Macs as it is one of the few programming tools that will work on machines with no more than 4 Mb RAM.

Silicon Beach SuperCard seemed to be the obvious successor, the so-called “HyperCard on steroids”. Its own language, SuperTalk, was an extended and mostly compatible development of HyperCard’s HyperTalk, and it supported 8 bit colour and script-controllable vector graphics.
http://en.wikipedia.org/wiki/Silicon_Beach_Software

SuperCard, whilst not neglected in the same way, passed from one owner to another for years, developing only gradually. I cannot tell you just how closely related it is to the original, but SuperCard appears to have evolved into something called LiveCode by Runtime Revolution.
http://www.runrev.com/

LiveCode deploys on a number of platforms including Windows, Linux, OS X, iOS and Android, and looks very promising. However, it seems to be lacking one of the fundamental features that I need, and that is to append single images to a movie file. Please correct me if I’m wrong, but I can’t find any mention of it, although I’m still looking into it.

And this is my big frustration when using very-high-level development tools. I tried using Apple Automator and QuickTime Pro player to assemble digital stills into movie files. Again, maybe it’s there but I couldn’t find it without having to operate the menu items in the player, and I really don’t want to go back to the days of using marionette software like Keyquencer (remember that?) or similar to operate programs via their menus. In my experience, automated clicking of buttons and selecting menu items is just not reliable or fast enough.

Adobe Photoshop’s Actions is a very powerful tool but it’s quite slow (although things may well have changed since CS3).

And this is when we get back to Linux, GIMP and ImageMagick. Whilst I have been banging my head against a brick wall for years, looking for the ideal development platform, Linux tools and libraries have been quietly maturing under my nose. I recently looked into using ImageMagick, which can do, well, everything. For the uninitiated, ImageMagick is a “software suite to create, edit, compose, or convert bitmap images” and can also procedurally create images by manipulating graphics or drawing shapes.

There are some very coherent and complete help files, written by Anthony Thyssen, and they seem to go on forever, documenting more and more features, available via command line. And the command line bit is the real killer because it means I can write a program and just call the single function I want, and add it to a Bash script.
http://www.imagemagick.org/Usage/

My own interest is in batch-converting, montaging of multiple images and format conversion of data sets, often comprising tens of thousands of images. I have managed to use gPhoto2 and FFmpeg to assemble the images into movies, and ImageMagick / GIMP will help me to manipulate the images if need be.

More soon…

The script here is only a slightly cleaned up version of the previous one, but also with a major addition. A timer.

It may be just that I’m new to Linux, but getting the syntax correct was very unintuitive. It took a lot of trial-and-error to get the spaces in the right place, and it reminds me a lot of programming in the 1980’s where you just get a “syntax error” message and nothing else.

This timer function uses the classic technique of storing the system time at the start of the script and then again once the script has finished, subtracting the former from the latter and the difference is the time taken.

This function only returns an the number of seconds as an integer, and a result of “1350575350” might as well be in grains of sand. So, I have then reformatted the output to a more human-readable minutes and seconds by dividing the number of seconds elapsed by 60 to get the minutes and deriving the modulus (what’s left over) for the number of seconds. I could also do a similar thing with the value 3600 if I wanted to format it in hours, minutes and seconds.

Strangely, when I tried date +%2s (which returns the current system time in seconds) at the command line in OS X it failed, but not on the same machine whilst booted into the Linux partition. Turns out, it was a typo but Linux is happy to ignore this glaring mistake (should be date +%s) whilst OS X is not. Strange when it’s so particular about other syntax.

However, all complaining aside, I have got some actual useful working code up and running much more easily than I had expected.

# !/bin/bash

clear
echo “Hello Monkey Planet”
starttime=$(date +%s)

cd /home/richard/Desktop/RBTest/newtest
rm *.JPG
rm *.jpg

cd /home/richard/Desktop/RBTest/testtemp
rm *.JPG
rm *.jpg

cd /home/richard/Desktop/RBTest/newtest
#gphoto2 –get-all-files

x=1; for i in $(find $(pwd) -name \*.JPG | xargs ls -t -r); do counter=$(printf %04d $x); ln “$i” /home/richard/Desktop/RBTest/testtemp/img_”$counter”.jpg; x=$(($x+1)); done

cd /home/richard/Desktop/RBTest/testtemp
ffmpeg -r 25 -i img_%04d.jpg -s 640×480 -qscale 1 -vcodec mjpeg movie.mov
rm *.jpg

stoptime=$(date +%s)
fulltime=$(expr $stoptime – $starttime)
fulltimesecs=$(expr $fulltime % 60)
fulltimemins=$(expr $fulltime / 60)

echo “$fulltimemins minutes $fulltimesecs seconds”

I suppose it would be good to structure this programming at some point, such as the timer function, so that I could call it from any script. There probably is a function in Linux already.

More soon…

THE CODE PUBLISHED HERE COMES WITH ABSOLUTELY NO WARRANTY WHATSOEVER, SO PLEASE USE AT YOUR OWN RISK.

I am basing my code on existing bits of open source stuff scavenged from various places and cobbled together. At some point in the future I hope to make some sort of point-and-click front end for it, but in the meantime it’s just command-line code, and at the moment, pretty crude.

Here is a slightly updated version of my previous script, which now clears the work folders and downloads from the camera using gPhoto2.

# !/bin/bash
clear
echo “Hello Monkey world”
#gphoto2 —

cd /home/richard/Desktop/RBTest/newtest
rm *.JPG
rm *.jpg
cd /home/richard/Desktop/RBTest/testtemp
rm *.JPG
rm *.jpg

cd /home/richard/Desktop/RBTest/newtest
gphoto2 –get-all-files

x=1; for i in $(ls -t -r *JPG); do counter=$(printf %04d $x); ln “$i” /home/richard/Desktop/RBTest/testtemp/img_”$counter”.jpg; x=$(($x+1)); done

cd /home/richard/Desktop/RBTest/testtemp
ffmpeg -r 25 -i img_%04d.jpg -s 640×480 -qscale 1 -vcodec mjpeg movie.avi

This is pretty clunky but at least it’s getting somewhere. At some point I’ll find out how to reference files case-insensitive.

On some of the older cameras, such as my A620, the camera saves images in discrete folders of only 200 images each, which means a lot of effort in post-production if it has to be done by hand.

I think the next logical steps are to compile multiple folders of images and also to name the destination movie file discretely. The name could be created from some format information, a date/time stamp, and the model of the camera which can be derived from gPhoto2.

Googling something about recursive folders I found this:

http://stackoverflow.com/questions/245698/list-files-recursively-in-linux-with-path-relative-to-the-current-directory

However, this does not return them in creation time order and, as far as I could google, there doesn’t seem to be an argument to produce that.

After googling something about Linux pipeline commands I found a reference to xargs, and Bob’s your uncle. I can hardly believe I found it so quickly, but I remember Martyn at Access Space telling me about pipelining so I used a bit of intuition and worked out how to take the results from the find command and sort them afterwards.

http://www.cyberciti.biz/faq/linux-unix-bsd-xargs-construct-argument-lists-utility/

Here is my Bride of Frankenstein, which takes a folder full of folders (full of images), lists them in creation order, renames them and compiles them into a movie file. Simples!

# !/bin/bash
clear
echo “Hello Monkey Planet”

cd /home/richard/Desktop/RBTest/testtemp
rm *.JPG
rm *.jpg

cd /home/richard/Desktop/RBTest/newtest

x=1; for i in $(find $(pwd) -name \*.JPG | xargs ls -t -r); do counter=$(printf %04d $x); ln “$i” /home/richard/Desktop/RBTest/testtemp/img_”$counter”.jpg; x=$(($x+1)); done

cd /home/richard/Desktop/RBTest/testtemp
ffmpeg -r 25 -i img_%04d.jpg -s 640×480 -qscale 1 -vcodec mjpeg movie.avi

Well, FFMpeg is a monster. Getting it to work with some default settings was easy, but the number of parameters is breathtaking. I work in professional video on a daily basis but can hardly understand any of the plethora of options. There is extensive documentation on ffmpeg.org but most of it is meaningless unless you already know what it means.

Below is the basic structure of a Bash script. It requires the #!/bin/bash at the beginning

#!/bin/bash
clear
echo “Hello world.”

This script clears the screen and prints the words “Hello world”.

An excellent beginners’ tutorial is here and I’m not going to to duplicate it.
http://linuxcommand.org/wss0010.php

This process reminds me of teaching myself to program back in the 1980s. In a good way and a bad way. One frustratingly fatal error after another is a real test of application, and that’s the discipline, but teaching yourself may be very time-consuming but it is also very educational.
After some head scratching I got this to work. It’s a bit of a Frankenstein lash-up with bits of code I got from various places, but also with a little bit of my own intuition. I discovered by trial and error how to change the target directory on-the-fly within the script and this made it much simpler.

It’s still a bit clunky and needs the download-from-camera stage adding but it works. I decided to include absolute paths to the work directories and point the script at them in turn, and so far I am running the script using the command ./myscript from the current directory.

# !/bin/bash
cd /home/richard/Desktop/RBTest/newtest
x=1; for i in $(ls -t -r *JPG); do counter=$(printf %04d $x); ln “$i” /home/richard/Desktop/RBTest/testtemp/img_”$counter”.jpg; x=$(($x+1)); done
cd /home/richard/Desktop/RBTest/testtemp
ffmpeg -r 25 -i img_%04d.jpg -s 640×480 -qscale 1 -vcodec mjpeg movie.avi

The next bit I need to add is the download stage using gPhoto2 to get the images from the camera so that I can have a single workflow to download and assemble the thousands of images files in separate directories into a single usable video file.

Some of this coding documentation needs expanding and tidying up, but stay tuned for more soon.

There are some technologies that none of us will miss, such as CRTs, the SCSI interface, VHS and (for me) optical storage media (CDs and DVDs). But one technological era I am particularly glad to leave behind is the 1980s, characterised by cassette-loading or actual typing in of huge BASIC programs, distributed in magazines.

These days we have an embarrassment of riches in the form of the internet. For a programmer, it's a goldmine of free resources. However, something that is often missing is an exhaustive deconstruction of the code, particularly useful to noobs. I'm a lapsed programmer, so I don't find it too hard, but Linux is new to me and has some strange “conventions”.

Anyway, as promised here is some actual code that I found (well, Google found it and I copied it) with some explanation about what the bits and pieces do. I will probably update this a bit and please let me know if you spot any errors.

FFMpeg requires an unbroken sequence of image files starting at 1 and will fail if the numbers are not continuous. This is not optional and so it is best to rename them as a matter of course.

The following two code snippets are from stackoverflow.com and I've adapted them slightly.

http://stackoverflow.com/questions/2829113/ffmpeg-create-a-video-from-images

This is the script for renaming the files.

x=1; for i in *jpg; do counter=$(printf %03d $x); ln "$i" /tmp/img"$counter".jpg; x=$(($x+1)); done

And here is the original FFMpeg command from the same source.

ffmpeg -f image2 -i /tmp/img%03d.jpg /tmp/a.mpg

Note:

24 seconds to ininitalise the Powershot A640 and another 9 minutes to download 2,595 images totalling 2.7 Gb (over USB 2 on 1st generation MacBook (1.83 GHz Intel dual core) running Ubuntu Linux 11.04.

Sort by creation date/time

x=1; for i in $(ls -t -r *JPG); do counter=$(printf %04d $x); ln “$i” /tmp/img_”$counter”.jpg; x=$(($x+1)); done

The $( some stuff ) contruct eveluates everything within the brackets before using the result. In this case, $(ls -t -r *JPG) returns a list of files ending in “JPG”, sorted by ascending creation time. The for i in $(ls -t -r *JPG) is a for..next loop where i is each file ending in “JPG”, sorted into creation time order.

The snippet counter=$(printf %04d $x) resolves the integer variable x into a 4-digit decimal number with leading zeros and puts it into the variable counter. The leading zeros are necessary in order to maintain the 8-character file names so that they sort alpha-numerically. The snippet x=$(($x+1)) increments the variable x by integer 1 after each renaming operation.

It’s important to get the capitalisation correct and the destination pathname, or it will just fail.

The -t modifier sorts by creation time in reverse order, most recent first. The -r modifier reverses that order to, in this case, change the order back to the correct chronological order.

Canon Powershot cameras automatically number the images files in the format “IMG_0001.JPG” and restarts the numbering after 9,999 images. It will automatically create a new folder every 2,000 images and will create a new folder and restart from 0001 once it gets to IMG_9999.JPG.

Consequently, it is possible that for a timelapse shoot, the file names will not be in continous alpha-numeric order. Sometimes they will be, but it’s as well to assume that they won’t. Also, gPhoto2 does not preserve the folder structure if you download using the gphoto2 –get-all-files command, and will dump the whole lot into a single folder.

In this case, it is very likely that the alpha-numeric order will not be strictly chronological. As a result, it was necessary to include an amendment to the code that will order them into chronological order before renaming them.

More soon.